I'm a butthead because I haven't posted even when I said I would.
But then I got my wisdom teeth pulled right after break, so that slowed things down a little.
Really. There WILL BE a post, soon.
And I'll explain my long long absence better.
Promise!
Love,
Neffie
Friday, December 21, 2012
Sunday, December 9, 2012
Finals and A Video
It's Finals week. I'm going home in 1 week from today and when I go home, I plan to do more DIY projects and to try to update more than once a week.
For now, here's a video of a song I wrote. I don't know why the video quality is so poor, but it is. Have a good Sunday!
For now, here's a video of a song I wrote. I don't know why the video quality is so poor, but it is. Have a good Sunday!
Sunday, November 25, 2012
Stress
Sorry guys. Too much college work. Keep checkin back though! Hopefully I'll have time to upload some nifty DIYs soon. Especially during Christmas break, which starts the 16th of December for me.
-Love,
Neffie
-Love,
Neffie
Sunday, October 28, 2012
Seed Bombs
This weekend is one of the weekends where I didn't have time to do anything to spectacular.
I had 2 midterms, work, a'cappella practice, declared my majors (yes, majors, Art and Ecology/Evolutionary Biology!) and then was gone all weekend for our Cloud 9 a'cappella retreat and so yeah, I got nothing done.
However, I did this summer!
Witness the miracle of seed bombs!
Or pops if you were the craft lady of a Christian camp!
The perfect way to garden like a pro without much effort and brighten up any vacant lot!
Just make sure to choose seeds that won't grow into invasive plants and that are native to your area before doing this!
It's best to do this outside on a warmer day while wearing older clothes.
Seed Bombs

Needs:
Clay, Dirt, Water, seeds.How to:
Take the clay and dirt and water and seeds and mash them in a bowl until it is a muddy consistency that can be easily rolled into a ball.
Roll the dirtseedmash into tablespoon sized balls and place on a baking sheet.
Set the seed pops outside in the sunshine until dry.
After they are dry, distribute to your friends and bomb the local plant deprived areas of your town/city/community/house/whatever.
Again. I'm not your mother.
Do whatever you want.
Expect, for realz, please use native plant species in your seed bombs!

Have a good day everyone!
Sorry for the not as up to par post, but I hope this at least inspires you to be a revolutionary gardener!
Love,
Neffie
Monday, October 22, 2012
Late Night Snack- Oatmealalmondraisinchocolatechip Cookies
Sorry about not posting on Sunday after being all "Look for my post on Sunday!"
Yeah. I failed. Sorry.
I was studying for my chemistry midterm and I really didn't want to fail that so, I sacrificed a blog post.
However, the reign of the chemistry midterm is now over so I can write a blog post.
Last week I was crazy sniffly and feverish and coughy and was worried I wouldn't even get anything done for this which was not ok in my book (and probably yours), but everything changed on Friday when my fever went away, sniffles subsided and hacking cough was reduced to a sudo-hacking.
And when that happens, what do you do?
That's right. You bake awesome cookies with your culinary-talented friend, Justin.
Let me tell you, these cookies are pretty sweet.
The are Oatmeal Almond Raisin Chocolate Chip Cookies.
I wanted to add coconut, but I know Justin doesn't like coconut (I know..that crazy creep), so I didn't put any in these, but if I made them again (I assure you, I will), I think I'll add coconut, and maybe swap almonds for walnuts because, well, I really like walnuts. They are also a bit more buttery than almonds, so I think that would have been nice. Maybe they would contrast too much with the almond extract though? I don't know. I'll find out someday. Or maybe you can try this with walnuts and tell me what you think.
Here's the recipe that you can choose to follow super accurately or not:
 1 3/4 cup flour
 11/2 tsp almond extract


Beat the middle ingredients together until well blended. (I recommend not doing this on the floor, but if your cord won't stretch to the table, then you know..go for it.)


 Eat those bad ass mo'fos.

Yeah. I failed. Sorry.
I was studying for my chemistry midterm and I really didn't want to fail that so, I sacrificed a blog post.
However, the reign of the chemistry midterm is now over so I can write a blog post.
Last week I was crazy sniffly and feverish and coughy and was worried I wouldn't even get anything done for this which was not ok in my book (and probably yours), but everything changed on Friday when my fever went away, sniffles subsided and hacking cough was reduced to a sudo-hacking.
And when that happens, what do you do?
That's right. You bake awesome cookies with your culinary-talented friend, Justin.
Let me tell you, these cookies are pretty sweet.
The are Oatmeal Almond Raisin Chocolate Chip Cookies.
I wanted to add coconut, but I know Justin doesn't like coconut (I know..that crazy creep), so I didn't put any in these, but if I made them again (I assure you, I will), I think I'll add coconut, and maybe swap almonds for walnuts because, well, I really like walnuts. They are also a bit more buttery than almonds, so I think that would have been nice. Maybe they would contrast too much with the almond extract though? I don't know. I'll find out someday. Or maybe you can try this with walnuts and tell me what you think.
Here's the recipe that you can choose to follow super accurately or not:
Late Night Cookies (aka:oatmealalmondchocolatechip cookies)
(by Justin Tam and Natalie Neff, adapted from Joy of Cooking) |
| Justin is on the right just so you know... |
Ingredients (makes about 48ish cookies)
1 3/4 cup flour
3/4 tsp baking soda
3/4 tsp baking powder
1/2 tsp salt
1/2 tsp ground cinnamon
1/2 tsp ground nutmeg
1 cup butter (that's two sticks for those of you who have trouble with this), softened
1/4 cup granulated sugar
1 1/2 cup packed brown sugar
2 eggs
1 tsp vanilla extract
11/2 tsp almond extract
1 cup raisins
3 1/2 cup old fashioned, rolled oats
1 cup chopped almonds
3/4 cup semi sweet chocolate chips
Steps:
Preheat oven to 350degrees (we set mine to 375 b/c it's a bit wonky
Grease cookie sheet.
Whisk together top ingredients in a smaller bowl and set aside
Beat the middle ingredients together until well blended. (I recommend not doing this on the floor, but if your cord won't stretch to the table, then you know..go for it.)
Stir the flour mixture into the middle ingredients until mixed
Add the bottom ingredients and stir in (with a wooden spoon or a mixer on low)
Shape the dough into 1-2 inch balls. Place about 2 inches apart on the baking sheet and flatten slightly with the palm of your hand (they should be about 1/2 inch thick after the flattening).
Bake for 12-14 minutes.
After they are done baking, let them stand a bit and then move them to a rack to cool.
Eat those bad ass mo'fos.
That's all.
Until next week.
Love,
Neffie
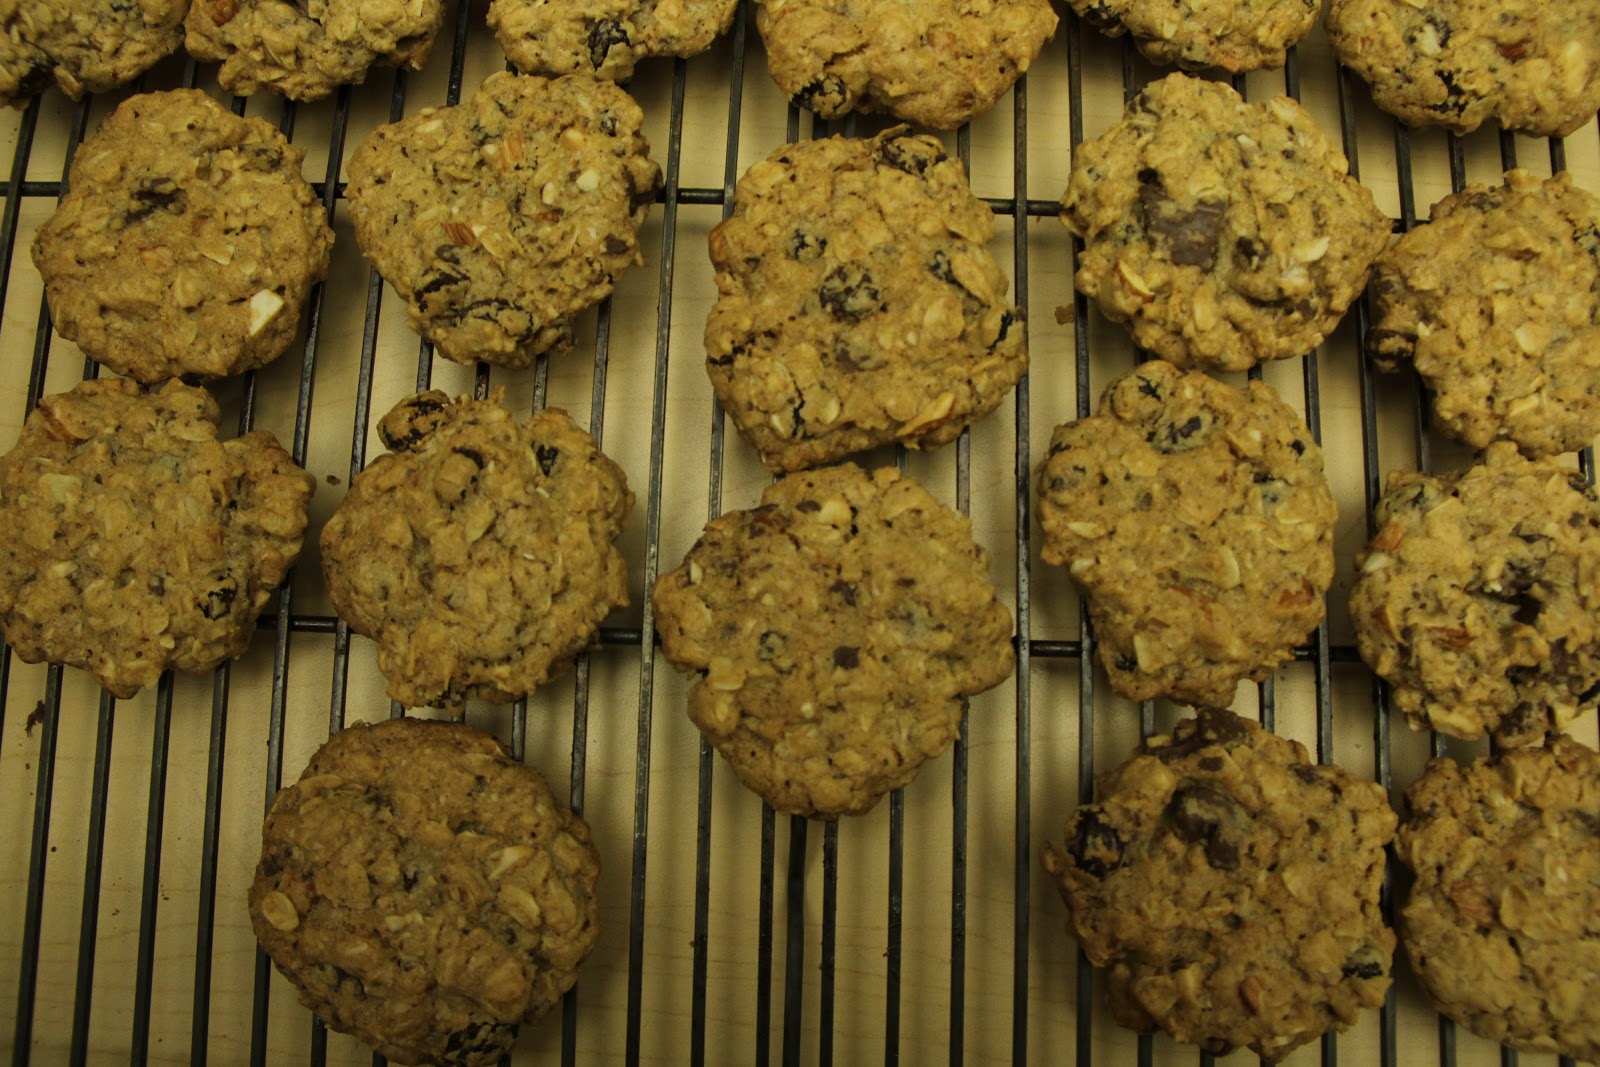 |
| They're cookies, you chunker. |
Sunday, October 21, 2012
Midterm Swamped
So. I failed at putting up a post for tonight. I did say sundayISH though..
I have a chem midterm in about 12 hours, so I'm studying and not writing an awesome blog post
Check back tomorrow (probably late..I'm going to a concert!) for a new post!
Here's a little gem/teaser about what tomorrows post shall be about

Until Monday...
-Neffie
I have a chem midterm in about 12 hours, so I'm studying and not writing an awesome blog post
Check back tomorrow (probably late..I'm going to a concert!) for a new post!
Here's a little gem/teaser about what tomorrows post shall be about
Until Monday...
-Neffie
Sunday, October 14, 2012
The Hiatus Is OVER! And a quick DIY involving twinkle lights and a coffee sack.
The Hiatus is OVER!
Why was it so long and not talked of?
Summer was exhausting.
Being the craft lady of a summer camp for children was absolutely wonderful, but very tiring and time consuming. Not to mention, the internet connection was extremely slow at the camp I worked at.
"But what about all the crafts you did there? Will I ever see them?" you may ask. The answer is "Yes!" but not for awhile. Slowly and surely, during weeks of midterms and finals and no cooking or DIY projects. In place, I'll put up some adorable pictures of children making things and write a little blurby on how to do what that talented, dapper 7 year old is doing.
In case you were wondering what else has happened after summer camp, this is it:
-Immediately after camp, move back to Santa Cruz into an apartment with 2 girls I barely know in order to become close friends with them, take biostats + lab, and eat ice cream from the Penny Ice Creamery every Sunday night.
-Move back home to hang out with family and realize I have to go back to Santa Cruz a week early for job training.
-Move back to Santa Cruz in an apartment on campus and live alone for a week unpacking, playing ukulele, and, of course, working.
-Help BFFs move in and rejoice that I don't have to be alone anymore!
-School, work, crazy a'cappella stuff, school, work, cleaning, midnight Pulp Fiction at the Del Mar, ice cream, ice cream, school, hanging out and stuff, a'cappella auditions, school, work, a bit of drunken partying, school, school, ice cream, a'cappella call backs, school, work, party, party and...now...today!
So. As you can see...I've been very busy. But I don't want to forget about this blog! It's important to me to be yet another aspiring DIY Blog-Goddess, and I can only achieve such title by blogging about my DIY projects and such. And other things you might not care about (ie: chemistry, losing my laundry card, a washed bean, etc.).
I'm going to try really hard to get one post done a week, most likely, sometime on the weekend. I'm aiming for anywhere between Friday night and Sunday, but most likely it will be on Sunday, so if you are one of the few, great people who is all "Yeah! Blog! DIY! Pie! Plants! Periodic Table of Elements!" then you should come back each Sundayish and look for a posty-post!
Also! If there is something you want to see done or baked or whatever, I might be able to do that. Leave a comment, send me a messenger pigeon, if you know me well enough, come over and talk to me to my face and I'll see what I can do.
And another thing..look out for these two in my posts. Why? Because they're awesome and I live with them:
 Courtney. Aka: Meowface
Where have I seen here before?: In my post about painting pots!
What?: She's a super fly, super shy (not so much anymore), powerful woman of our age!
Does she do things?: Environmental Studies/Art major! Also working on a Zine and taking a yoga class with Cedar.
Favorite DIY project ever done: Making a book! But not writing in it. The cover especially.
What she wants you to know about her: She doesn't like talking about herself because she says she's not good at interviews. (A small prying later...) She don't know...fine. She's allergic to deer.

Cedar. Aka: Badass.
Where have I seem him before?: The banana ice cream morning post!
What?: Keeping it real, eating popcorn with nooch and always out on an adventure.
Does he do things? Art major and a certified Wilderness First Responder (almost)! Works at the Rec, leads adventure outings, and takes yoga with Courtney!
Favorite DIY project ever done: He wants to know if drawing a life sized self portrait on a door counts. I say yes.
What he wants you to know about him: He likes to sketch boobs. (We have proof of this taped up on our wall in the kitchen)
And that's all you need to know about them..for now!
I'm going to give you your DIY project and leave you in peace till next Sunday! Ish!
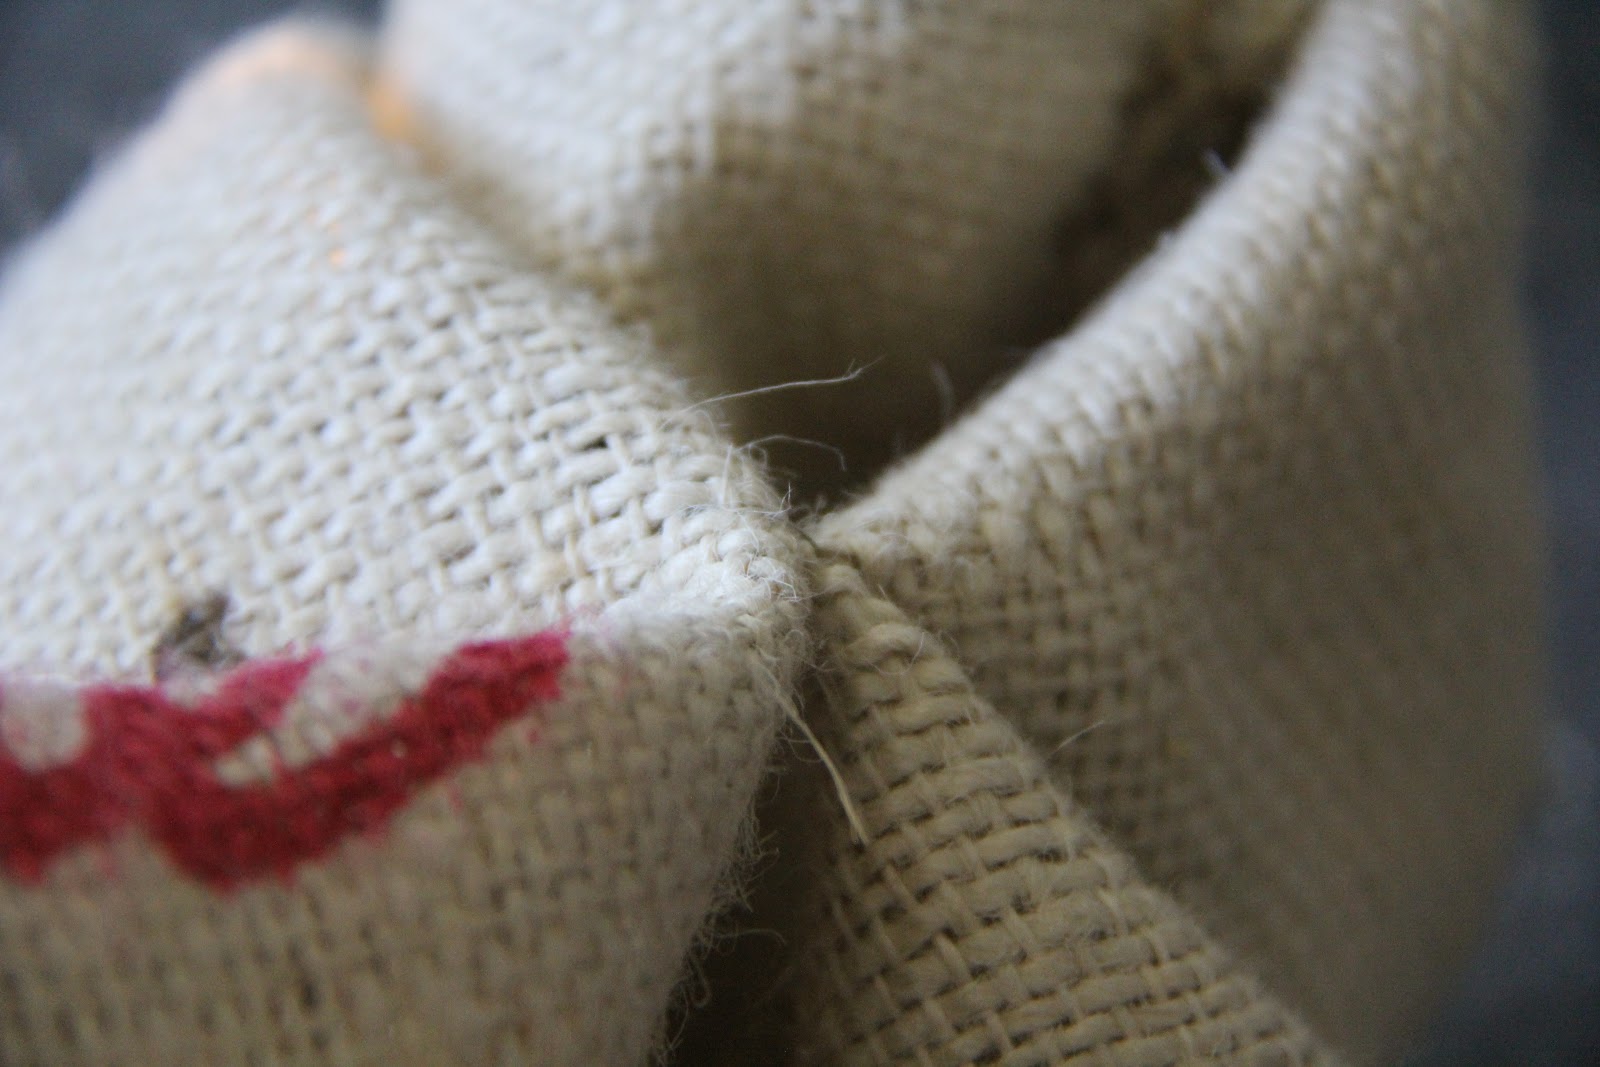
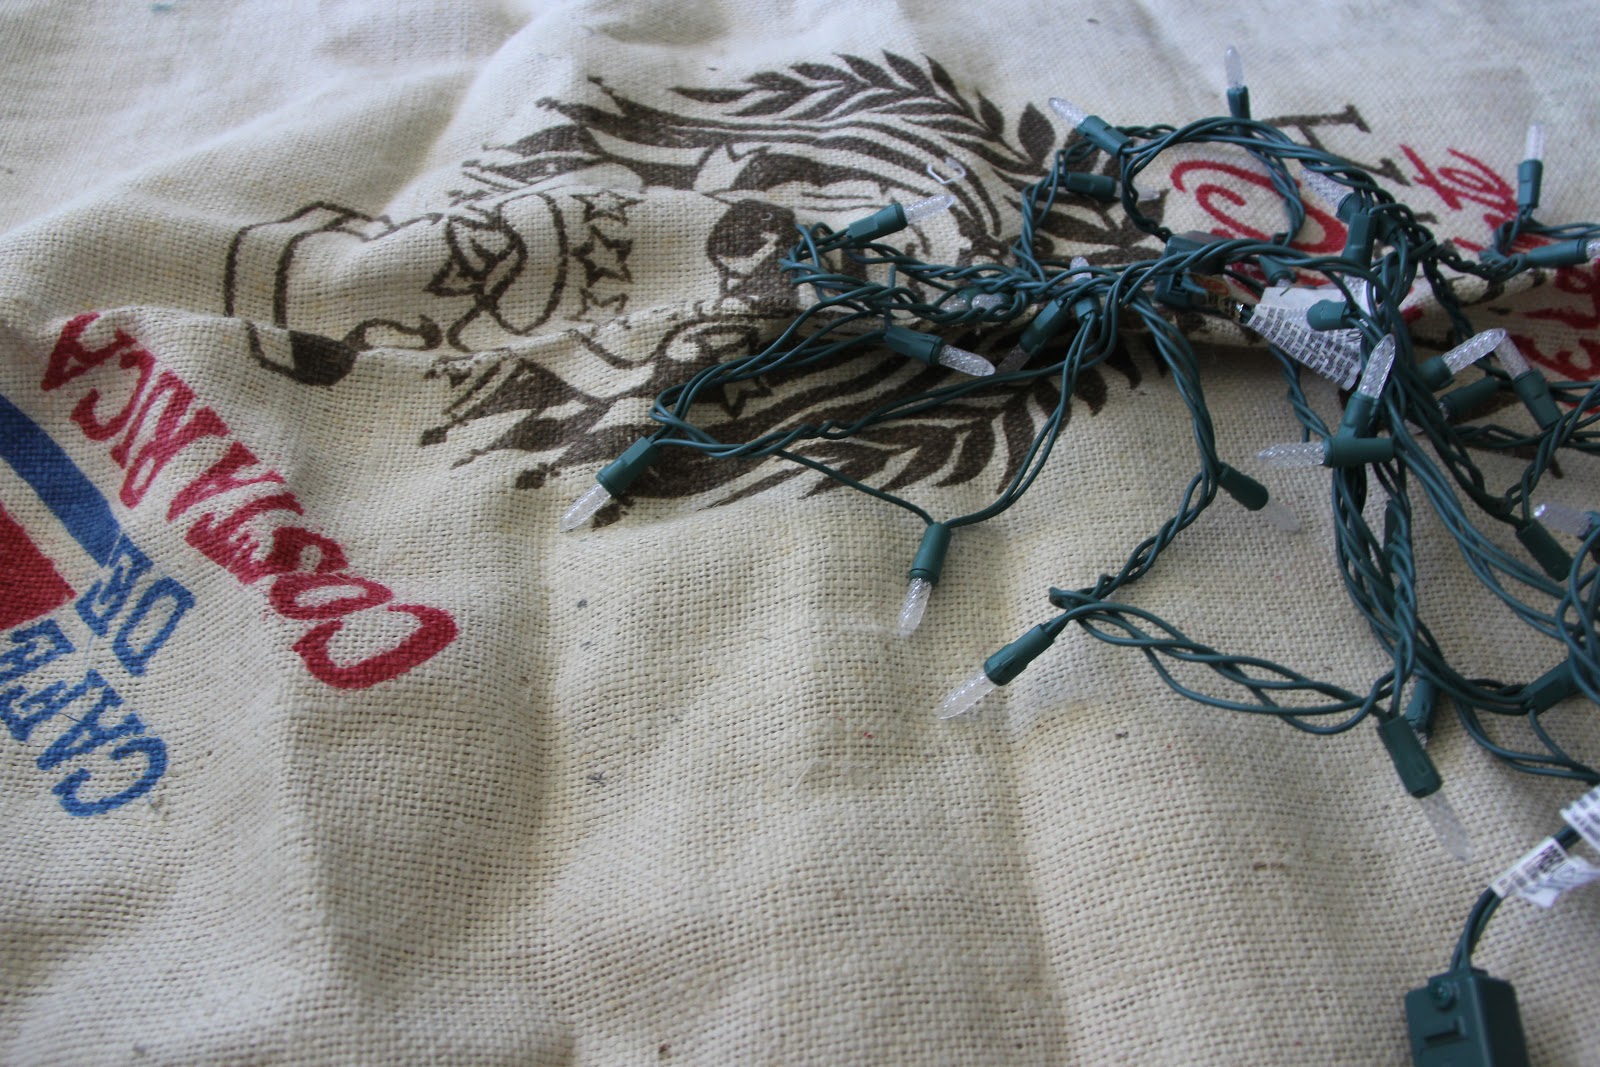 Gather materials. Like..the coffee sack and twinkle lights. I got my coffee sack from my dad, who is a chef, and buys large amounts of coffee. If you don't have a parent who buys coffee in sack form, check your local coffee shop and politely ask them if you can have a coffee sack for your new DIY project that's totally going to tie your living room together. If they won't give you one or don't have one, just steal one from the local Starbucks who's probably upsetting your favorite friendly, hip, coffee shop anyways.
I got my lights from my garage. You can check a thrift store or wait until Christmas is near and people have decorated their houses with twinkle lights and take some from your super annoying neighbors who never let you have any fun that involves some sort of noise past 8 at night if you don't have any.
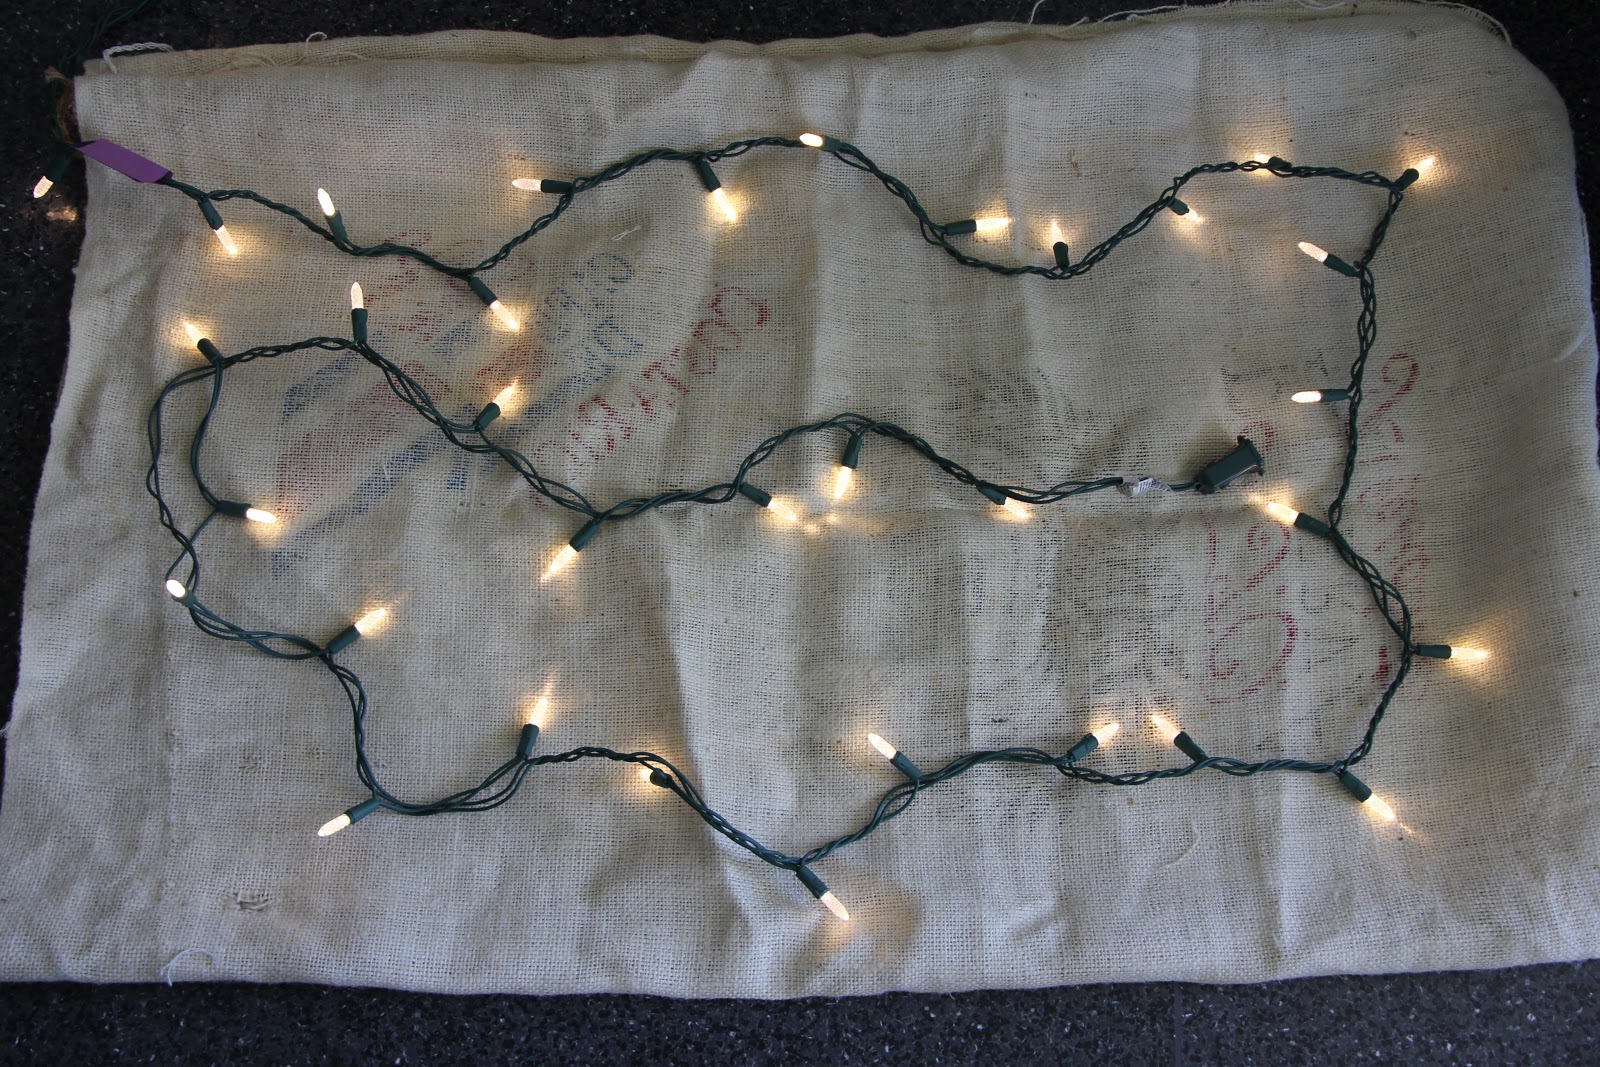
After gathering your materials, start the making light process. Turn the coffee sack inside out with the design
facing towards you. As shown in this picture.
Then, take the lights and arrange them in an up down like pattern. Or a spiral. Or in a clump. I don't care. These aren't really steps, they're more guidelines anyways. The purple post it note is where I needed to stop placing lights in the coffee sack so my cord would stretch to the outlet. You could also do this project with an extension cord or cut a hole in the bottom of the sack so your lights come out that way and none are on the wall. But, I don't have an extension cord, I have lights. And I didn't poke a hole in the bottom of my sack, so whatever. I'm thinking of making little "coffee beans" to go over my dangling strand from the sack because that's cheaper than buying an extension cord. Maybe. Whatever. Guidelines, people. Guidelines.

That's it. Pretty easy. Doesn't take too long. Looks cool in a college apartment. Or anywhere. I mean, let's be real here.
Happy Sunday. See you next week with something else. I guess.
Love,
Neffie
Why was it so long and not talked of?
Summer was exhausting.
Being the craft lady of a summer camp for children was absolutely wonderful, but very tiring and time consuming. Not to mention, the internet connection was extremely slow at the camp I worked at.
"But what about all the crafts you did there? Will I ever see them?" you may ask. The answer is "Yes!" but not for awhile. Slowly and surely, during weeks of midterms and finals and no cooking or DIY projects. In place, I'll put up some adorable pictures of children making things and write a little blurby on how to do what that talented, dapper 7 year old is doing.
In case you were wondering what else has happened after summer camp, this is it:
-Immediately after camp, move back to Santa Cruz into an apartment with 2 girls I barely know in order to become close friends with them, take biostats + lab, and eat ice cream from the Penny Ice Creamery every Sunday night.
-Move back home to hang out with family and realize I have to go back to Santa Cruz a week early for job training.
-Move back to Santa Cruz in an apartment on campus and live alone for a week unpacking, playing ukulele, and, of course, working.
-Help BFFs move in and rejoice that I don't have to be alone anymore!
-School, work, crazy a'cappella stuff, school, work, cleaning, midnight Pulp Fiction at the Del Mar, ice cream, ice cream, school, hanging out and stuff, a'cappella auditions, school, work, a bit of drunken partying, school, school, ice cream, a'cappella call backs, school, work, party, party and...now...today!
So. As you can see...I've been very busy. But I don't want to forget about this blog! It's important to me to be yet another aspiring DIY Blog-Goddess, and I can only achieve such title by blogging about my DIY projects and such. And other things you might not care about (ie: chemistry, losing my laundry card, a washed bean, etc.).
I'm going to try really hard to get one post done a week, most likely, sometime on the weekend. I'm aiming for anywhere between Friday night and Sunday, but most likely it will be on Sunday, so if you are one of the few, great people who is all "Yeah! Blog! DIY! Pie! Plants! Periodic Table of Elements!" then you should come back each Sundayish and look for a posty-post!
Also! If there is something you want to see done or baked or whatever, I might be able to do that. Leave a comment, send me a messenger pigeon, if you know me well enough, come over and talk to me to my face and I'll see what I can do.
And another thing..look out for these two in my posts. Why? Because they're awesome and I live with them:
Where have I seen here before?: In my post about painting pots!
What?: She's a super fly, super shy (not so much anymore), powerful woman of our age!
Does she do things?: Environmental Studies/Art major! Also working on a Zine and taking a yoga class with Cedar.
Favorite DIY project ever done: Making a book! But not writing in it. The cover especially.
What she wants you to know about her: She doesn't like talking about herself because she says she's not good at interviews. (A small prying later...) She don't know...fine. She's allergic to deer.
Cedar. Aka: Badass.
Where have I seem him before?: The banana ice cream morning post!
What?: Keeping it real, eating popcorn with nooch and always out on an adventure.
Does he do things? Art major and a certified Wilderness First Responder (almost)! Works at the Rec, leads adventure outings, and takes yoga with Courtney!
Favorite DIY project ever done: He wants to know if drawing a life sized self portrait on a door counts. I say yes.
What he wants you to know about him: He likes to sketch boobs. (We have proof of this taped up on our wall in the kitchen)
And that's all you need to know about them..for now!
I'm going to give you your DIY project and leave you in peace till next Sunday! Ish!
DIY Coffee Sack Light!
Need:
-Twinkle lights
-Thumbtacks (about 6)
-thin wire or floss or embroidery thread
-a plastic needle or like, a regular needle or whatever
-a coffee sack (duh.)
-scissors or wire cutters or knife object
-This project takes approximately 2/3 of "Tiger Milk" by Belle and Sebastian.
Steps
Gather materials. Like..the coffee sack and twinkle lights. I got my coffee sack from my dad, who is a chef, and buys large amounts of coffee. If you don't have a parent who buys coffee in sack form, check your local coffee shop and politely ask them if you can have a coffee sack for your new DIY project that's totally going to tie your living room together. If they won't give you one or don't have one, just steal one from the local Starbucks who's probably upsetting your favorite friendly, hip, coffee shop anyways.I got my lights from my garage. You can check a thrift store or wait until Christmas is near and people have decorated their houses with twinkle lights and take some from your super annoying neighbors who never let you have any fun that involves some sort of noise past 8 at night if you don't have any.
 |
| Arranged. |
facing towards you. As shown in this picture.
Then, take the lights and arrange them in an up down like pattern. Or a spiral. Or in a clump. I don't care. These aren't really steps, they're more guidelines anyways. The purple post it note is where I needed to stop placing lights in the coffee sack so my cord would stretch to the outlet. You could also do this project with an extension cord or cut a hole in the bottom of the sack so your lights come out that way and none are on the wall. But, I don't have an extension cord, I have lights. And I didn't poke a hole in the bottom of my sack, so whatever. I'm thinking of making little "coffee beans" to go over my dangling strand from the sack because that's cheaper than buying an extension cord. Maybe. Whatever. Guidelines, people. Guidelines.
After arranging, take your wire or thread or whatever and your needle and thread around the strand in certain areas to hold the lights in place so that when you hang up your beautiful work of art, the lights don't all sink to the bottom, unless, of course, you want it that way. I'm not your mom, do what you want. But for the LOVE of GOD, do NOT DO THIS:
 |
| Save yourself! |
This can be avoided by not being distracted by Belle and Sebastian and by paying attention and not sewing through both pieces sack fabric so that when you go to inside out it, it doesn't because, surprise! You sewed both pieces of sack fabric together!
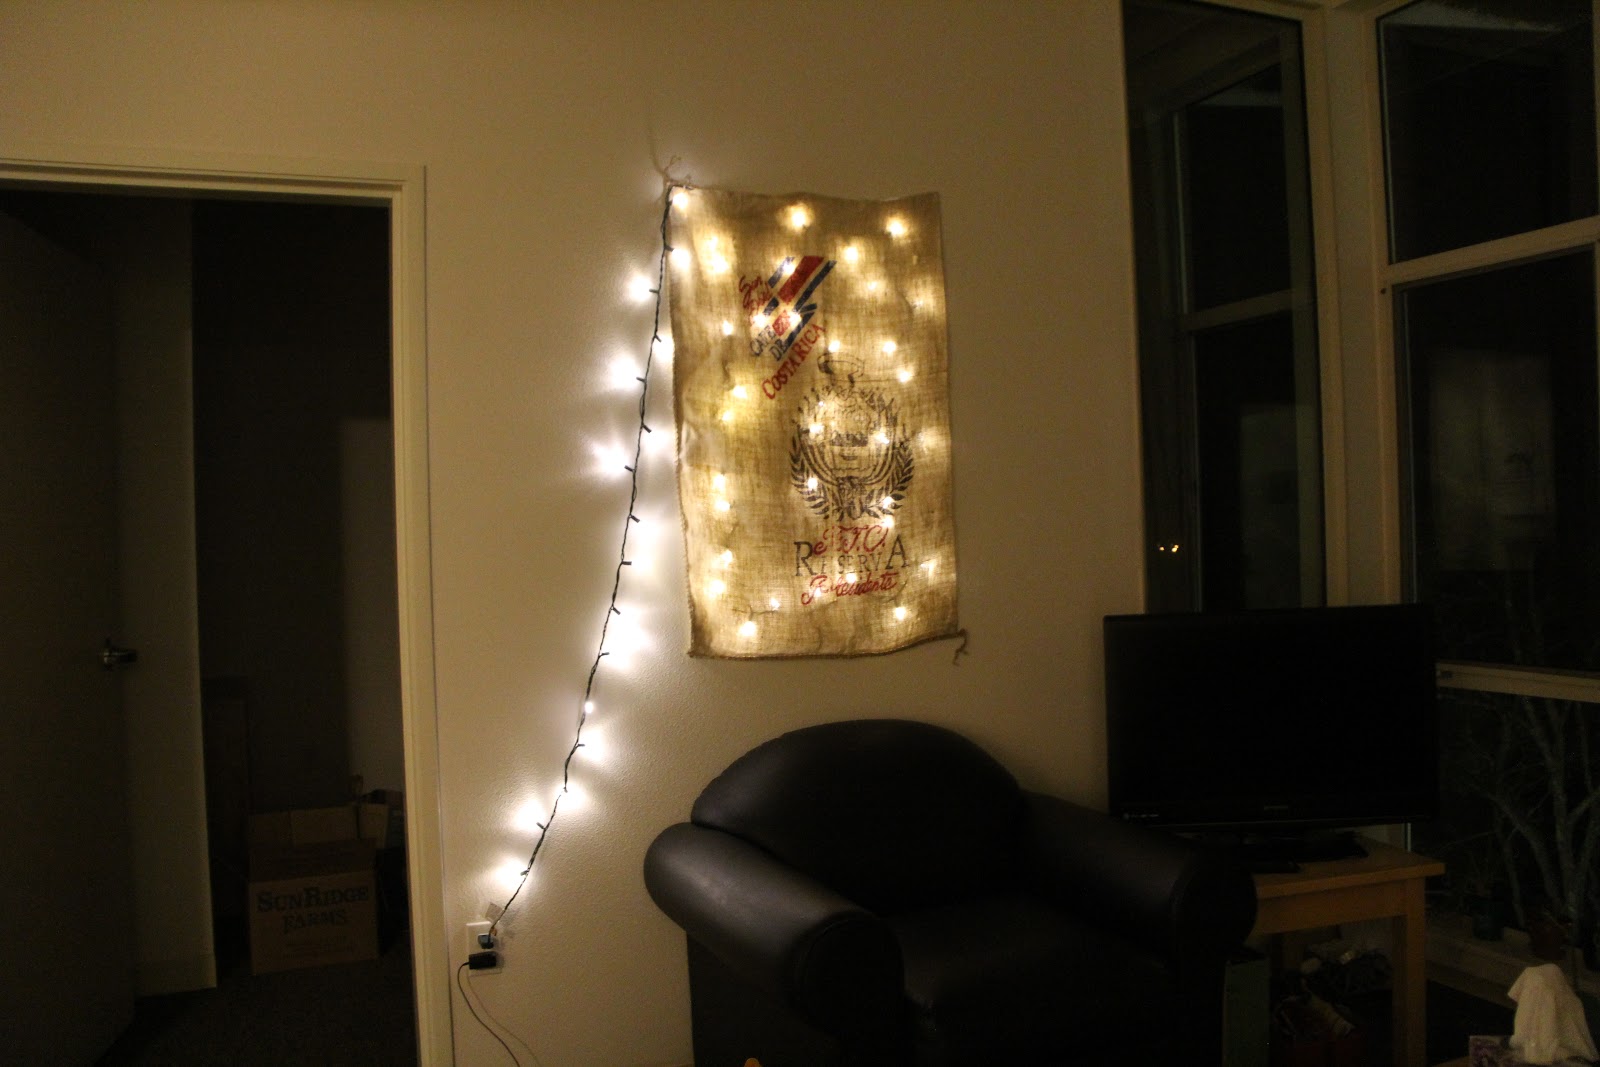
After that, Hang that sucker up with thumbtacks or earring posts or whatever pointy objects you've got.
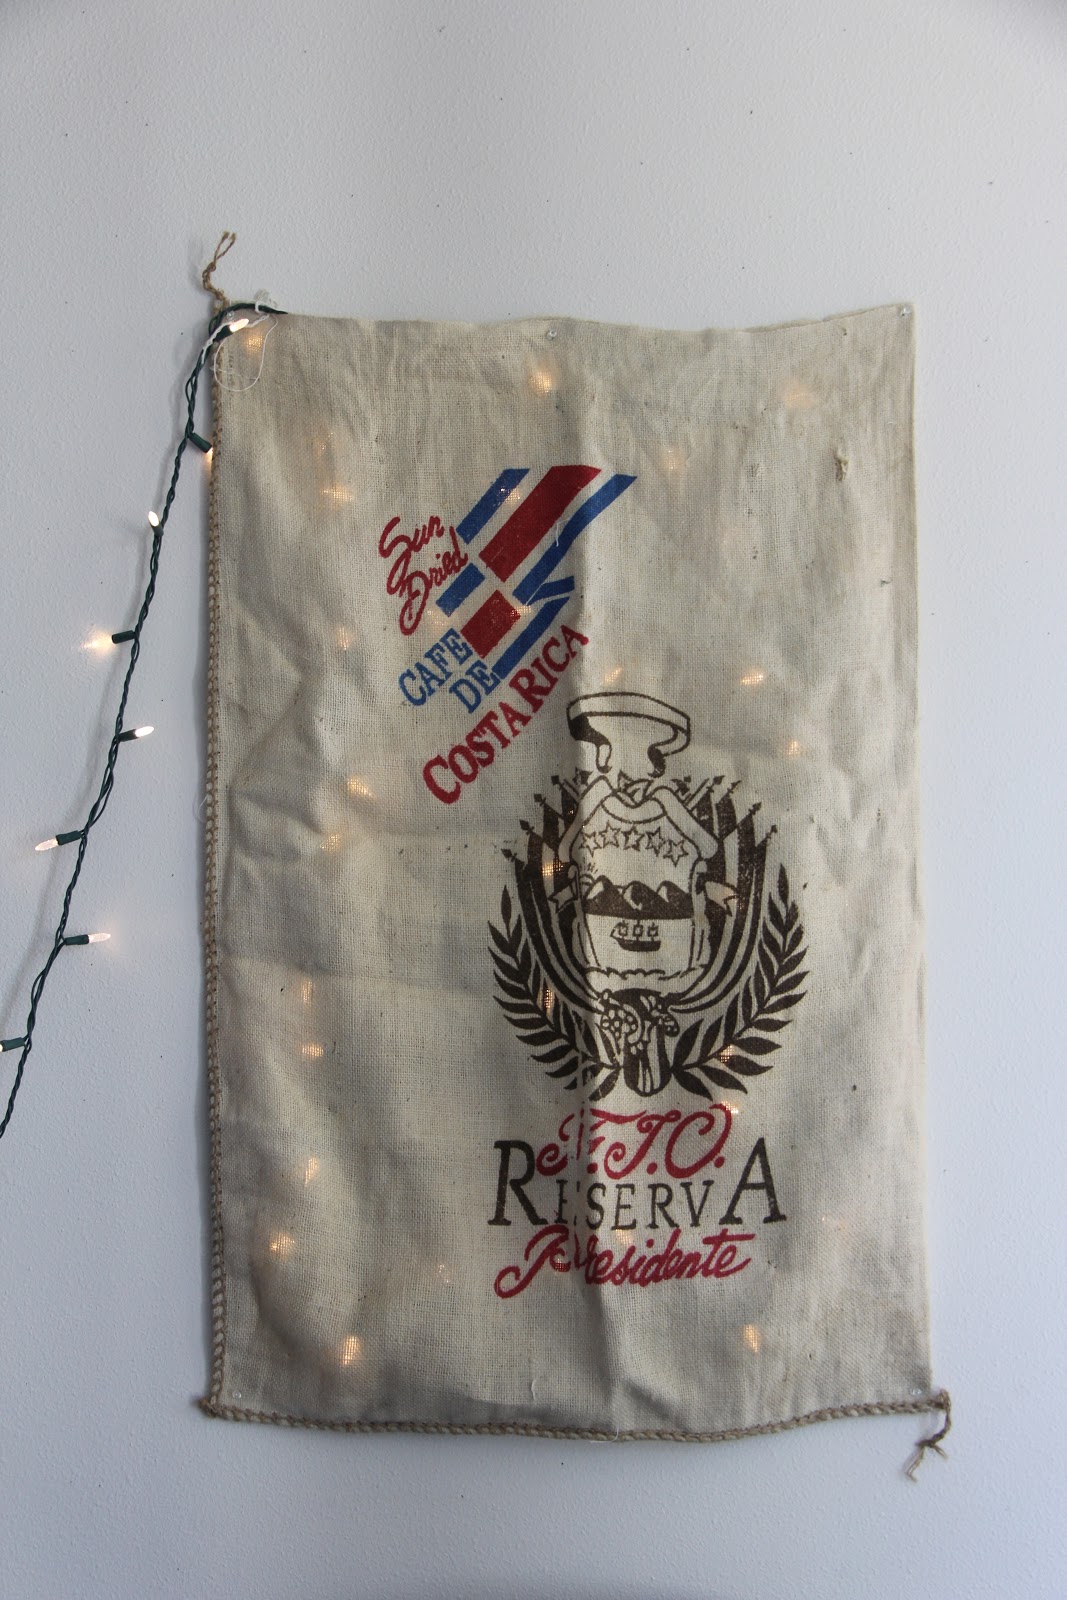 |
| Ohmyglob it's so pretty! |
 |
| Another picture with different exposure. Yeah. Whatever dude. |
Love,
Neffie
Saturday, August 4, 2012
Several Weeks of Nothing
My blog posts ceased over the summer.
I am sorry.
The reasons are as follows:
I was working at a summer camp and the internet we had there was terribly slow, so, to write a blog post was painful and uber time consuming.
I didn't really want to be on my computer a lot since I was surrounded by such wonderful friends and creation.
I was not allowed to put pictures of campers online until I finished camp.
I just didn't have time.
However, now I am moved into a room in my sublet apartment in Santa Cruz taking BioStats and a lab. And I have a lot more time, internet and no rules on posting pictures of campers online.
So,
Because of this...
I'll be able to go back to updating like normal.
Since I was the Craft Lady (yeah, that was my job) I made a lot of crafty thing-a-ma-jigs.
These include:
Chalk, spray paint art, hemp bracelets, inspiration cubes and more!
I need to look through my photos, I'm sure I have most of my crafts photographed, and if not, that gives me the perfect reason to make it again!
I'll try to get something DIYish back up on here soon!
Love,
Natalie.
Oh, and because I feel bad...here's a video on friendship from my favorite show, Adventure Time.
http://www.youtube.com/watch?v=RZv6OnRcI0Q
Enjoy!
Sunday, June 10, 2012
A Small Break From Studying
Taking a small break from studying to tell the few people who read this that I have not disappeared, but have just been overwhelmed with school.
Today is Sunday, tomorrow begins finals weeks.
These last few weeks of my first year of college have been both beautiful, sad and stressful.
After finals, I am trekking up to Camp Calvin Crest.
I had the honor of being knighted as Crafty Chica for the summer.
This means I will be making lots of crafts with young, children and high schoolers.
So,
Stay tuned for some crafts, camp stories and more after Wednesday!
Sunday, May 27, 2012
Frozen Banana Ice Cream (for breakfast!)
On Thursday, I wanted ice cream for breakfast.
So did my roomie, Cedar, and her girlfriend, Krista.
I got to work.
I had frozen some bananas earlier because I like to eat frozen bananas, but they were going to be sacrificed for the sake of ice cream!
Here's what I had gathered:
3 frozen bananas
a bowl of cherries
some strawberries
chocolate chips
2 not frozen bananas

In case you have never made frozen banana ice cream, you are supposed to take the frozen bananas and place them in a food processor and process them until they become chopped up into little balls and then into this delectable, super fluffy and ice cream delicious-looking concoction.
But, I am in college and do not have a food processor, I have a blender. So I used that.
It did NOT work that well. I had to continually stop the blender and stab at things as well as you can stab with a wooden spoon and take bananas out and crush them with forks a little and stab more and it was a lot of work and mess.
In the end the blender did work, but I could not fully achieve the same tasty consistency that makes frozen banana ice cream so delicious, which was disappointing, but I was going to be ok with it, because, I wasn't about to let three frozen, tasty bananas simply get eaten by the compost.
I am determined to try this again with a food processor when school gets out and I have access to one.
 After I kinda got the right consistency, I threw in the strawberries and some chocolate chips. Which was a wonderful idea.
Then I poured/scooped (stabbed?) out the ice cream into three mugs for Krista, Cedar and I.
We garnished it with cherries and not frozen bananas because well..frankly..we all really enjoy bananas.
Not gonna lie, felt pretty good to eat ice cream for breakfast.
So did my roomie, Cedar, and her girlfriend, Krista.
I got to work.
I had frozen some bananas earlier because I like to eat frozen bananas, but they were going to be sacrificed for the sake of ice cream!
Here's what I had gathered:
3 frozen bananas
a bowl of cherries
some strawberries
chocolate chips
2 not frozen bananas

In case you have never made frozen banana ice cream, you are supposed to take the frozen bananas and place them in a food processor and process them until they become chopped up into little balls and then into this delectable, super fluffy and ice cream delicious-looking concoction.
But, I am in college and do not have a food processor, I have a blender. So I used that.
 |
| Cedar and Krista |
In the end the blender did work, but I could not fully achieve the same tasty consistency that makes frozen banana ice cream so delicious, which was disappointing, but I was going to be ok with it, because, I wasn't about to let three frozen, tasty bananas simply get eaten by the compost.
I am determined to try this again with a food processor when school gets out and I have access to one.
 After I kinda got the right consistency, I threw in the strawberries and some chocolate chips. Which was a wonderful idea.
Then I poured/scooped (stabbed?) out the ice cream into three mugs for Krista, Cedar and I.
We garnished it with cherries and not frozen bananas because well..frankly..we all really enjoy bananas.
Not gonna lie, felt pretty good to eat ice cream for breakfast.
Wednesday, May 23, 2012
Reasons Why I Struggle In Chemistry.
All of the reasons I struggle in chemistry:
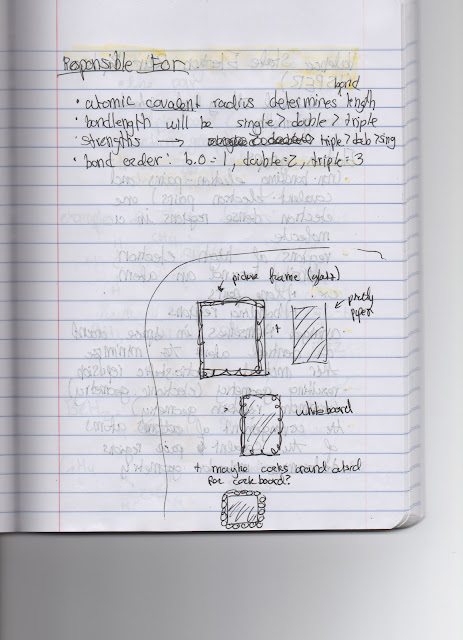
Responsible for knowing that: Atomic covalent radius determines bond length, Some other things about bonds, Making a pretty whiteboard for my apartment next year.

Art. I'm not artsy. But I like to pretend. And..I am good at knitting...so sometimes I combine my fake artsy-ness with knitting.
 I once saw some flower twinkle lights for sale...then, while learning about delocalized bonding, I decided I could probs do a DIY version of that. No time like the present to draw out a quick sketch. Don't forget to highlight it for later.
 |
 |
I once saw some flower twinkle lights for sale...then, while learning about delocalized bonding, I decided I could probs do a DIY version of that. No time like the present to draw out a quick sketch. Don't forget to highlight it for later.
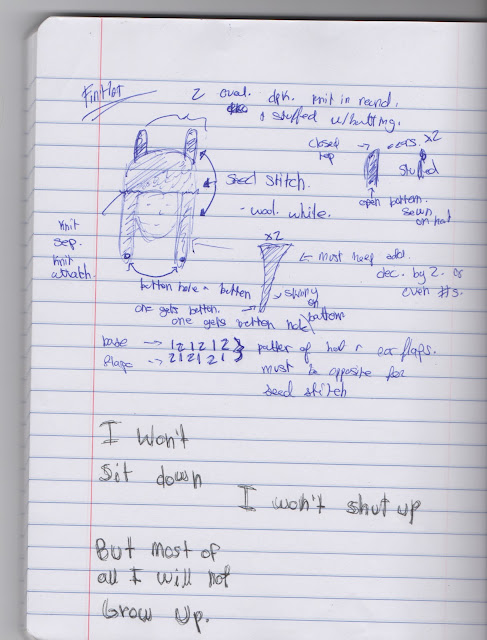
And lastly, my growing obsession with Adventure Time lead me to design a Fin the Human hat. It's so special, it gets it own page. Complete with Frank Turner lyrics.
And that, right there, is why I struggle in Chemistry.
Wednesday, May 16, 2012
Wishlist
Instead of doing math and chem homework. Here's a tiny wishlist:
A Graphic Tablet. For drawing on photos and such.
$30 at amazon.com

Pixelmator. Basically a cheaper version of Adobe Photoshop.
$30 on apple's app store.

Then, I could edit photos like a boss. But, I'm ok without them, of course. Just sayin'...pretty cool (:
A Graphic Tablet. For drawing on photos and such.
$30 at amazon.com
Pixelmator. Basically a cheaper version of Adobe Photoshop.
$30 on apple's app store.
Then, I could edit photos like a boss. But, I'm ok without them, of course. Just sayin'...pretty cool (:
Tuesday, May 15, 2012
Panther Beach, Santa Cruz
I like taking pictures.
Here are some from the well kept secret beach, Panther Beach that's somewhere around Santa Cruz.
Went there a few weekends ago with Jackson.
I take photos manually because normally a camera messes up the white balance, too bad I forgot to change the white balance. I tried fixing it, but not all the pictures took to that well. So, I ended up just editing some to cover it up. And, I think in the end, they all turned out alright.


Monday, May 14, 2012
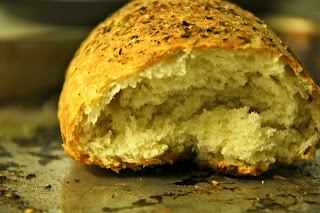
Late Night Bread Baking
Two posts in one night might be an abomination, but I don't care too much and besides, I'm going to share a ridiculously easy bread recipe with you, so, be happy.
When I got back from Santa Barbara (left SC to visit boyfriend is SB this weekend, oh my)
I wanted to make bread so I could eat something tomorrow.
Justin had invited me over for some creamy mushroom sauced noodles, and before I trekked up the stairs to his house, I made a little ball of bread dough to let rise for a few hours while I ate pasta, pretended to do math homework, and watched the food network.
Then I came back, finished math homework, got ready for bed and...
remembered about the dough.
So, I went into the kitchen and baked up a baby loaf of bread for myself, while thinking "I will be regretting this when getting up for bio at 8 am tomorrow.."
Here's the recipe. The loaf in the picture is half of this recipe. I obtained this recipe at the summer camp I worked at last summer and every once in a while, make a tiny loaf for myself when I don't have bread or don't have money to get bread, but have flour and yeast. I made my baby loaf with thyme, sea salt, and cracked pepper mixed in the dough. After I rolled out the loaf, I covered it in olive oil and sprinkled the top with more sea salt, cracked pepper and thyme. This recipe is extremely versatile, so feel free to experiment. Sometimes, I'll make it with whole wheat flour or half whole wheat and half all-purpose and I've even made it sweet by adding more sugar into it, or I'll make a "breakfast bread" by adding raisins and cinnamon to it. Be creative and adventurous!
Camp Bread:
Basic Ingredients:
2 1/2 cups flour
1 cup water
1 tsp yeast
1 tsp salt
1 tsp brown sugar or honey
Preheat oven to 350 deg. F.
Mix yeast and warm water in a bowl. Let it sit for about 2 minutes.
Add flour, salt, sugar/honey and whatever else you want.
Let it rise for about an hour in a covered bowl. (I normally just stick a pie pan on top of my mixing bowl)

Roll out dough and place on baking sheet.

Bake for 30 minutes.
Eat.


Long Day and Zimriding
Guess I should make another post since my last one is just a link thingy to bloglovin'.com that I had to do or else..I don't know.
Bad things would happen.
Like...
this blog would not end up on bloglovin.com
Anyways...here is a tip for life:
When being a driver for other people, be nice and courteous. Otherwise, your passengers may feel like giving you bad reviews on zimride.
The end.
Bad things would happen.
Like...
this blog would not end up on bloglovin.com
Anyways...here is a tip for life:
When being a driver for other people, be nice and courteous. Otherwise, your passengers may feel like giving you bad reviews on zimride.
The end.
Wednesday, May 9, 2012
Bloglovin'?
Follow me on bloglovin!
Woohoo!
<a href="http://www.bloglovin.com/blog/3712931/love-neffie?claim=fbdxcfdpmnq">Follow my blog with Bloglovin</a>
Weird...but must be done.
Woohoo!
<a href="http://www.bloglovin.com/blog/3712931/love-neffie?claim=fbdxcfdpmnq">Follow my blog with Bloglovin</a>
Weird...but must be done.
Tuesday, May 8, 2012
Key Lime Pie!
Yesterday was Monday. Or for those of you who love Adventure Time as much as I do, it was Adventure Time Monday.
Adventure Time Monday involves me going to the apartment above and left of mine to watch 3 old and 1 new Adventure Time episodes with my buddy, Justin, and his housemates and such.
Normally I just make some popcorn, but yesterday, I went all out and made a key lime pie!
Technically, it was just a lime pie, as I could not find key limes or key lime juice anywhere, so yeah. It was still tasty and you can make this pie with good ol' lime, but I do like it best with Key Limes.
Super easy, tasty and straight out of Village Baker's Wife cookbook. One of the best books known to man kind. I highly recommend visiting Gale's Bakery if you're ever around the Santa Cruz area, that is where this recipe comes from.
Anyways...Here's how to make it!
1.5 cups crushed graham crackers
.5 stick butter (melted)
Preheat oven to 350 degrees F.
Crush up graham crackers. You can use a food processor, a blender, your own strength, doesn't matter. Just crush up dem crackers!
Then, melt the butter.
Mix butter and crumbs with your hands or a spoon in a bowl.
Place "dough" in pie pan and spread evenly around the pie pan with your fingers.
Bake crust for 5 minutes and then let cool for about 1/2 hour before putting pie in it.
1 can (14 oz) of sweetened condensed milk
1/2 cup lime juice*
1/2 tsp vanilla extract
 *about 4 limes will do the trick. If you're buying limes and not juice, make sure to juice them before making your pie!
Put cream cheese in mixing bowl and mix until smooth and creamy.
While still mixing, get your sweetened condensed milk and pour in a steady stream into cream cheese. Mix until well incorporated.
Add lime juice and vanilla extract. Mix until well incorporated.
Grab your prebaked graham cracker crust and pour filling into it.
Smooth it out and freeze for approx. 2 hours pre serving or fridge for 5.
I got a little fancy with mine and placed limes around the edge.
Then I made the whipped cream and being a college student, I thought to myself "I don't want to carry whipped cream and the pie to Justin's..." So I whipped the cream, chilled it for awhile, then spread it on top of the pie. It looked a little messy, so I made another scalloped edge with limes going in the opposite direction and, I have to say, it looked pretty awesome.
It was just Zora, Justin and I yesterday. But we all enjoyed pie. Some a little more than others...
Point is, Key Lime Pie makes just about anything, and especially Adventure Time, more algebraic.
Adventure Time Monday involves me going to the apartment above and left of mine to watch 3 old and 1 new Adventure Time episodes with my buddy, Justin, and his housemates and such.
Normally I just make some popcorn, but yesterday, I went all out and made a key lime pie!
Technically, it was just a lime pie, as I could not find key limes or key lime juice anywhere, so yeah. It was still tasty and you can make this pie with good ol' lime, but I do like it best with Key Limes.
Super easy, tasty and straight out of Village Baker's Wife cookbook. One of the best books known to man kind. I highly recommend visiting Gale's Bakery if you're ever around the Santa Cruz area, that is where this recipe comes from.
Anyways...Here's how to make it!
Graham Cracker Crust
Ingredients:
1.5 cups crushed graham crackers
.5 stick butter (melted)
Preheat oven to 350 degrees F.
Crush up graham crackers. You can use a food processor, a blender, your own strength, doesn't matter. Just crush up dem crackers!
Then, melt the butter.
Mix butter and crumbs with your hands or a spoon in a bowl.
 |
| Make sure to get the edges! |
Key Lime Pie
Ingredients:
8 ounces of cream cheese1 can (14 oz) of sweetened condensed milk
1/2 cup lime juice*
1/2 tsp vanilla extract
 *about 4 limes will do the trick. If you're buying limes and not juice, make sure to juice them before making your pie!
Put cream cheese in mixing bowl and mix until smooth and creamy.
While still mixing, get your sweetened condensed milk and pour in a steady stream into cream cheese. Mix until well incorporated.
 |
| Steady Stream... |
 |
| Lime juice and vanilla extract! |
 |
| Pour it in there! |
Smooth it out and freeze for approx. 2 hours pre serving or fridge for 5.
 |
| PIE! |
Whipped Cream
Ingredients:
Heavy whipping cream
Some sugar
Pour some cream and sugar into a bowl.
Whip it until it looks like whipped cream.
Serve with pie!
I got a little fancy with mine and placed limes around the edge.
 |
| Lime edge..eh? |
 |
| Lookin' pretty mathematical right now. |
It was just Zora, Justin and I yesterday. But we all enjoyed pie. Some a little more than others...
 |
| Zora likes pie. |
 |
| Justin...likes it too much. |
Subscribe to:
Posts (Atom)